Buffing the Finish
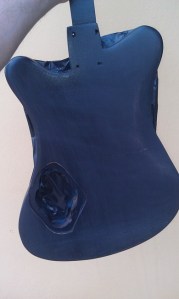
With the top coats applied and left 7 days to dry it was time to finish off the finishing. The first step is to wet sand the body, wet sanding leave scratches that have a shallower curve and are therefore less severe looking. I started out at 800 grit, sanding until there were as little shiny spots left as possible, the finish should look completely dull before moving on to the next step.
After wet sanding with the 800 grit I moved on to the 1200 grit, this step isn’t strictly neccessary, but it does lessen the scratches from the 800 grit paper and therefore will make the final buffing step easier. Again I wet sand all over with sanding paper and allow the guitar to dry. Something I should mention is that at this stage it’s important to clean the sanding paper as often as possible to prevent the lacqeur from building up in the paper and making new scratches that will require a lot of sanding to remove.
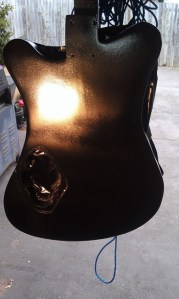
Once the finish is dry it’s time to buff the guitar. There are several ways you can do this, the most professional finish is achieved with a buffing wheel. This was a piece of equipment I wasn’t willing to buy because I had already bought an orbital sander. Another common way to buff is to use devices such as orbital sanders but instead of attatching sanding paper, you attach buff pads. This is what I did and it certainly made the job a lot easier than if I had done it the old fashioned way by hand.
Meguiars mirror glaze range was reccomended on many forums as a great buffing compound, so after a trip to Super Cheap Auto I picked up two different buffing compounds. The grit ranged from 0 to 10 with 10 being the roughest grit, having sanded all the way to 1200 I started at fine-cut which sits around 5 on the scale. If you finish sanding at 800, then starting out at medium cut which is arround 8 was reccomended. I had a separated buffing pad for each compund to avoid introducing larger scratches when I moved to a finer compound. I applied and wiped some of the first compound onto the guitar, and I did the same to the buffing pad to get things started. Using the slowest setting and a steady motion I buffed the entire surface of the guitar till there were no dull spots, making sure that all the compound had been rubbed into the guitar finish.
I then changed buffing pads and went down to the finer grit, the swirl remover was a 3 on the scale. This last compound would add just a little extra shine to the finish. I used the same procedure as the first time until the guitar came up in a great shine, I’m not a massive fan of those overly glossy mirror like finishes but a nice shine is still required. With all the buffing done that was the end of the finishing process and the guitar looks great!
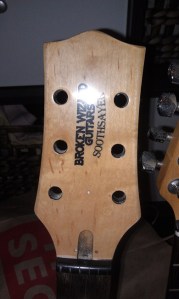
I also wet sanded the headstock with 400 and then 800 to level out the finish, because it was a satin finish I only buffed it using the fine cut. You wouldn’t buff the neck at all in order to create a nice smooth playing surface, but the headstock has the logo so I buffed it a little to bring out the text.
The Headstock and Neck
You may remember that I did not want to build the neck for this guitar considering the precision work that is involved and so I bought a cheap guitar to use for parts. Having previously striped the headstock of the black top coat I was now left with the bare wood. Unlike the body the neck will be finished with a satin lacqeur, this time polyurethane because it was readily available from bunning in the small quantity that is required. Satin lacqeur is like clear lacqeur except that it has chemicals in it that make it less glossy and smoother to the touch after light sanding, being satin the sanding doesn’t show up much either which negates the need for buffing. Satin is my prefered finish for a neck because it creates a less sticky, smooth finish which is much nicer to play on.
Having sanded the headstock with 240 and then 360 grit paper I sprayed on the satin lacqeur to a wet consistency, unlike the nitrocellulose the polyurethane takes a bit longer to dry and also dries harder. I had to wait about 5 hours before applying a second coat. After applying the second coat I let the finish dry over night before sanding with 360 grit paper to smooth over the finish in preparation of recieving the water transfer decal. I located water transfer decal paper online. The water transfer is a lot cheaper than the vinyl transfer paper and is more easily concealed by the subsequent top coats, and besides, if water transfer is good enough for leo fender, it’s certainly good enough for me!
I tried various different font and sizings before I eventually decided on this;
Broken Wizard is an online alias I have been using for over 10 years, my music prodcution and other creative enterprises also bear the Broken Wizard moniker so I decided to give my guitars the same name. The cybertooth font stood out to me, it’s not like a lot of other guitar fonts which have resembled the Fender logo or more 20s and 30s style fonts like Gibson and Gretsch. It’s a bold, solid modern looking font which should be visable form a decent distance, even if not legible. Sticking with the Broken Wizard theme I decided to name all my custom guitars after types of wizard. In this case I went for soothsayer, a soothsayer is a fortune teller and magician from the roman era, the name seemed to fit the curvey edgey design of my guitar. To contrast the manufacture font and create a sort of mystical feel I used the Algerian font for the guitar name.
I used my printer to print the decal, cut it out and then soaked it in water for thirty seconds or so. The transparent top part of the paper slides off easily and located fairly easlily when applied to the sanded surface. I used a small soft brush to smooth out the decal and then used dry kitchen towel to remove the excess water. The manufacturer reccomends that you let the decal dry for three hour so I will leave it over night, this way it will be as dry as possible before I spray another two coats of satin lacqeur over the top of it to seal it in.
Once the 2nd layer of lacqeur has dried for 5 hours or so I will sand it lightly with 360 grit, and then wet sand it with a higher grit paper, maybe 400 or 800 to properly smooth out the finish, this step will be especially important on the neck for the other project guitar I am finishing because this will be the playing surface on the back of the neck so I need it to be smooth for a good playing experience.
Applying Colour
This week I applied the colour to my guitar build, I also started the finishing process on a kit that I purchsed from guitarkitsdirect.com as well as continued to work on my Squire strat, the first guitar I ever owned, the finish was in a sorry state so it was a good practice model.
The colour has been the single most stressful part of this whole experience, Mirotone make pigmented lacqeurs, but at $40 for a 4L tin it seemed foolish to buy 4L in several different colours when I only need about 300ml for each guitar. You can also buy acrylic lacqeur in a range of colours from a spray can, but again I already had the nitrocellulose and the spray can finish isn’t quite as good as that of the spray gun. Also for one of the kits I have comming I wanted to make a custom colour, so I set about trying to find pigments to that were compatible with my nitrocellulose finish to mix in to make the colours I wanted. Australia is not a great place to do this at all! In the USA places like Stewart Macdonald have all the colours you could want however the only guitar laqceur specific dyes I could find were analine dyes, these are transparent and wouldn’t have worked.
So eventually I had to threw caution to the wind, I found a hobby site, Dalchem, they had both transparent and opaque pigments for addition to polyurethane resin, given that my guitar finish is basically a thin version of resin, (nitrocellulose in my case not polyureathane) I purchased some opaque white and black as a base and some transparent colours to add to these. Luckily for me they were perfectly compatible! The white especially required quite a lot of pigment to be completely opaque but I wasn’t worried, the pigments were only $15 each so I saved myself a lot of money and also gained the ability to make custom colours, I’ll talk more about applying those later on though.
At the end of last week I had done all the sanding, washcoating, grain filling and barrier coating which meant it was time to apply colour to the guitars. As you may recall I decided to keep the top of my guitar a natural finish so you can see the wood underneath, the back grainfiller did a great job of accentuating the pores but I still wanted to spruce the appearance up a bit. For this I used a transparent stain from feast and watson which was available from bunning, I used elm as the colour as it wasn’t too intense but had a nice golden colour to it. Rather than staining the bare wood (which looked terrible on my test on scrap) I added some of the stain to lacqeur in a fairly thick mix and applied two coats. If you compare last weeks wash coat only with the new colour you can see the diference it has made.
With the most important part of the guitar (visually speaking) taken care of it was time to colour the back, although originally I was going to make the back transparent black I decided it would be easier to make it opaque. When laying down a colour coat I decided it would be best to first lay down a primer. This is a pigmented coat that is sanded to a smooth finish using the 360 grit sanding paper. For lighter colour coats a white primer is common, and for dark backgrouns a grey primer is prefered. Because I was using black, I decided to make the grey quite dark so I added one mL of white and 2mL of black pigment to my lacqeur which was a 2:1 lacqeur:thinner mix. I laid it on wet, this means it’s a bit thicker and shines when still wet, the wash coats being thinner were laid on in a drier more sparse spray pattern to avoid runs. Before spraying the primer I masked off the top of the instrument as well as a little of the sides in order to make a binding like effect using painters tape and plastic liner.
I sprayed the first coat a little too thick in some places which caused runs, build ups of lacqeur, which needed to be sanded out after an appropriated period of drying to let the finish harden, I sanded the whole primer to a really smooth finish using the 360 grit sand paper which meant that a more even smooth colour coat could be applied. You don’t want to have to modify a colour coat because the sanding and imperfections will show through once the top coats are added. Having learnt from the previous experience with coating I made the black lacqeur and sprayed it on being careful not to spray it too thick and managed to avoid runs.
After the colour is applied I left it overnight to dry and harden. I then began the process of applying the top coats, these are thick (2:1) coats of clear lacqeur. You apply 4 -8 coats spread over a few days in order to build up a protective layer of finish that is thick enough to accept the buffing compounds without burning through, I’m currently on the 7th coat, tomorrow I will add one final coat and then let the finish harden for 7 days before beginning the final sanding and buffing process.
In between coats there was a 1 – 2 hour gap, this meant that I also had time to work on the headstock of the guitar, I will talk about that in a different post though. I am really close to the end of the process now with only the buffing, components and the electronics left, as well as the creation of the top and back control plates. It feels good after weeks of work to finally be getting closer to that finish line, I can’t wait to post a video of the guitar in action!


